Website indexing: extending the functions of HTML Indexer
HTML Indexer (www.html-indexer.com) is the only commercial indexing tool that is designed for the indexing of websites. For a review of the software, refer to Heather Hedden's article Software for HTML indexing: a comparative review in The Indexer (www.hedden-information.com/wp-content/uploads/2019/07/Software_for_HTML_Indexing.pdf).
This article is a result of problems that we had when we created the index on www.techscribe.co.uk/techw/a-z-index.htm. The article shows how to extend the functions of HTML Indexer by including special codes in the entries, then post-processing the generated HTML to get the final HTML. (To prevent long sentences, we use the term generated HTML to mean the output from HTML Indexer and the term final HTML to mean the HTML code that is used in the index page.)
Design objectives for the index
The design objectives for the index are as follows:
- Conform to best-practice guidelines for website indexing (https://digital-publications-indexing.org/index.php/indexes-on-the-web/web-index-best-practices/).
- Match the visual design of the TechScribe website.
- Have different output for the screen version and the printed version of the index, but do not have a special 'print-friendly' page.
- Conform to the W3C specifications and pass all validation tests (https://validator.w3.org).
- Not manually edit the generated HTML. (The TechScribe website is frequently updated. Therefore, for efficiency, all changes to the code generated by HTML Indexer must be done programmatically.)
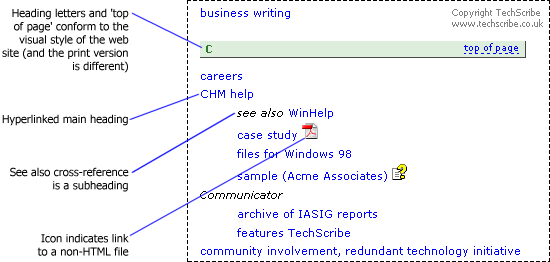
Figure 1 shows an example from the screen version of the completed index.
Figure 1. Part of the completed index
Limitations of HTML Indexer
HTML Indexer has the following limitations:
- HTML Indexer does not let the indexer distinguish links to non-HTML pages (such as PDF file, Word files, video files).
- If there are subheadings for a heading, creating a hyperlinked heading is difficult.
- A see also cross-reference appears as a separate entry.
- It is not possible to create generated HTML that conforms to the website requirements for heading letters and 'top of page' links.
- The generated HTML does not conform to W3C standards.
Solutions
HTML Indexer generates HTML code that is consistent (unlike some help authoring tools). Therefore, changing the generated HTML programmatically is simple.
We use three basic methods:
- Change the generated HTML. For example, this is done to create the final HTML for the heading letters and the 'top of page' links and to make the generated HTML conform to W3C guidelines.
- Add arbitrary text to an entry and then change the generated HTML. For example, +j in an index entry is changed to HTML code that marks the start of a citation (
<cite>) and j+ is changed to HTML code that marks the end of a citation (</cite>). - Use HTML Indexer in a non-standard way. We use this method to create hyperlinked headings where there are also subheadings, and to create see also cross-references.
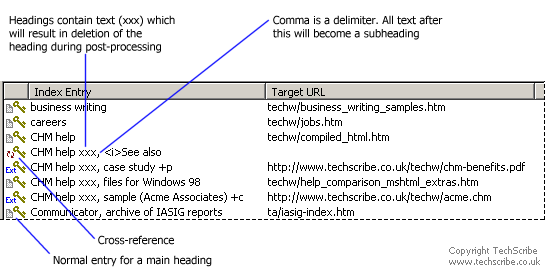
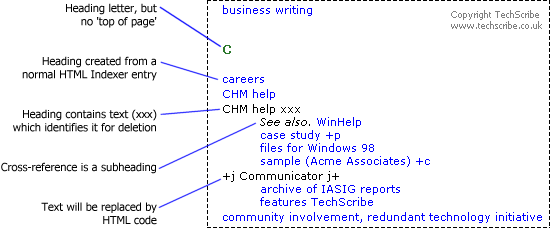
Figure 2 shows the index entries in HTML Indexer, and Figure 3 shows the generated HTML in a web browser.
Figure 2. Entries in HTML Indexer
Figure 3. Part of the index from the generated HTML
To create the icons in the final index (Figure 1), the macro identifies the file extension, and then creates the HTML code automatically. (Initially, we used codes in the index entries. For example, +p was changed into code to display an image that represents a PDF file.)
Hyperlinked headings with subheadings
By default, HTML Indexer does not create a hyperlinked heading if there are subheadings. You can force HTML Indexer to create a hyperlinked heading by including HTML code in the text for the heading. (The section 'Create hyperlinked common headings' on the HTML Indexer Tips and Techniques web page shows how to do this. However, the method is difficult, and is not recommended by the developers of HTML Indexer.)
One solution is to create the heading in the usual way. The generated HTML will contain a link to the web page. For each subheading, create an entry where the heading contains some additional text that shows that the entry will be deleted during post-processing, as shown in Figure 2.
See also cross-references
Usually, a see also cross-reference is part of an entry. One entry for a heading and another entry for a cross-reference from that heading is not standard indexing practice. HTML Indexer creates a separate entry for a cross-reference, as shown here:

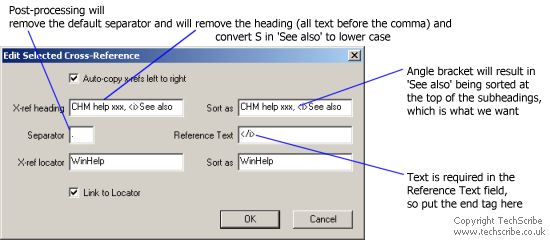
The solution is to create the see also text as a subheading, as shown in Figure 4.
Figure 4. See also cross-reference as a subheading
By default, the 'Sort as' entry field contains the same content as the 'X-ref heading' field, and this does not need to be changed. The <i> is HTML code that causes the text that comes after it to be displayed in italics in a web browser. The filing order of the angle bracket will cause the subheading to be at the top of the list. (To have the cross-reference on the same line as the heading requires a simple change to the post-processing macros.)
The 'Reference Text' field cannot be empty. Therefore, the field has the HTML code that ends the instruction to create italic text (</i>).
An alternative to using the <i> and </i> markup is to use codes, and to change the codes during post processing. This method allows for conversion to semantic markup (the strictly correct option), instead of hard-coding the tags for the italic text.
Summary
The method is not too complex. You must specify some easy-to-remember codes, and you must create macros to change the generated HTML (TechScribe uses Microsoft Word, but there are text editors that have macro functions). After you update the index in HTML Indexer, you must copy the generated HTML to the editing tool, run the macro, and then copy the HTML to the final index.
From a commercial perspective, visual appearance and consistency in a website are both important. Conformance to best practice shows that you value your index and the people who use the index.


